How-to
Add a plug-in
Add a plug-in to give Starboard something new, such as Live TV or more styles to choose from. Starboard shows what the plug-in may do and tests it before anything is added. At the end, the plug-in is active and what it adds is ready to use.
Before you begin
- The plug-in is in the Catalogue, or you have its manifest address, its
starboard-plugin.jsonfile or its installer. Plug-ins you can add are also listed in The plug-in collection. - You know your Starboard password. Adding and removing a plug-in ask for it.
- To understand what a plug-in can and cannot do first, read What a plug-in can change.
Steps
- Go to Settings, then Plug-ins, then Catalogue. The catalogue lists the plug-ins built into Starboard, the Starboard plug-ins collection by kind, and the plug-ins in any catalogue you added.
- Find the plug-in and select Install…. For a plug-in built into Starboard, select Add and its name. A plug-in that is not in any catalogue can be added by its address: read Add a plug-in by its address.
- A slide-out opens. It says the plug-in is installed at your own risk, then lists what it can read, what it can change, what it can reach, what it runs and what it can never reach. Read it all.
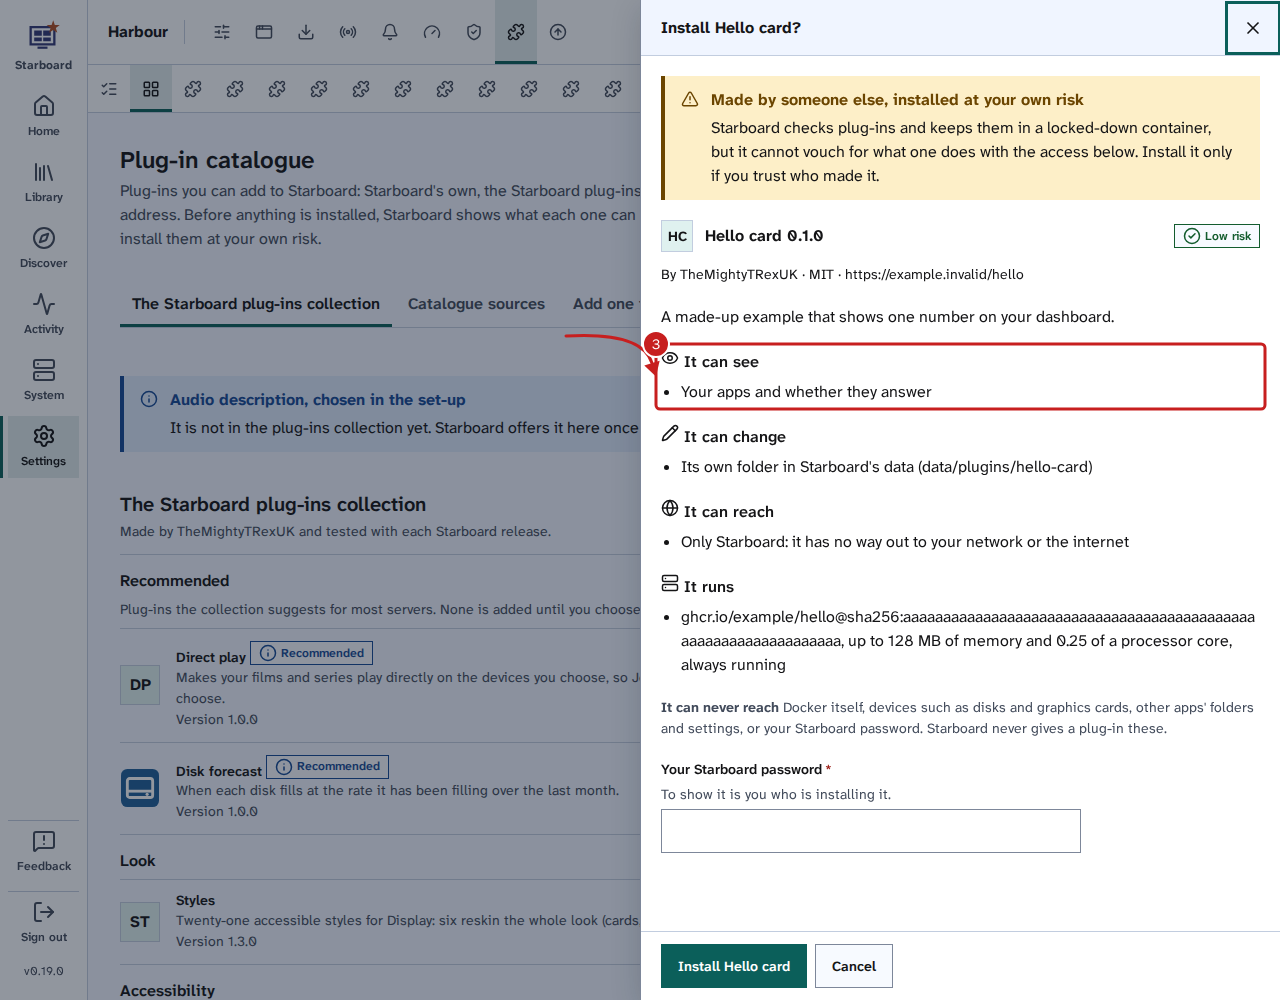
- To go ahead, enter your Starboard password and select Install and the plug-in's name. To stop, select Cancel: nothing is installed.
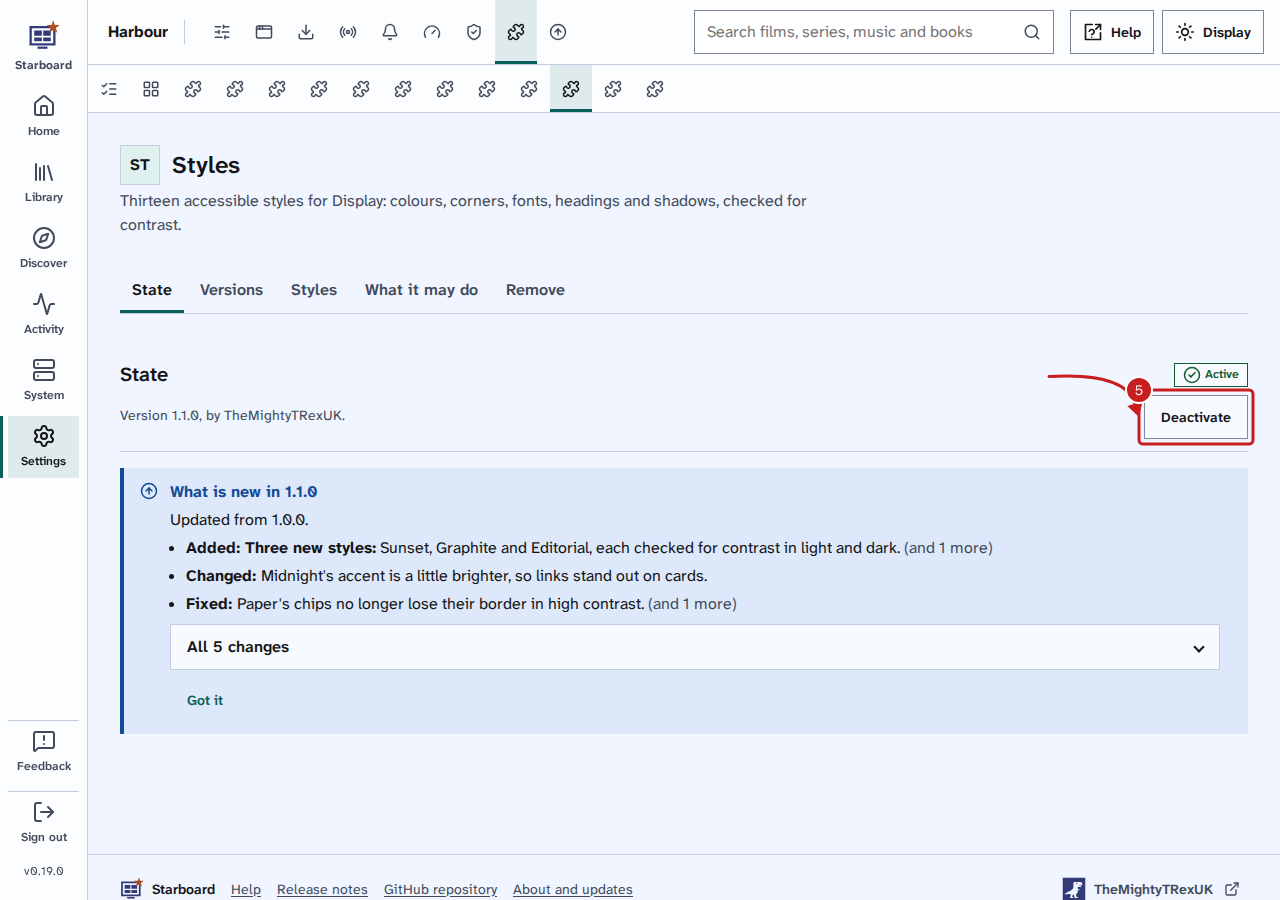
- The plug-in's own tab opens, under Settings, then Plug-ins. Select Activate. Its state changes to Active. To stop it later, select Deactivate.
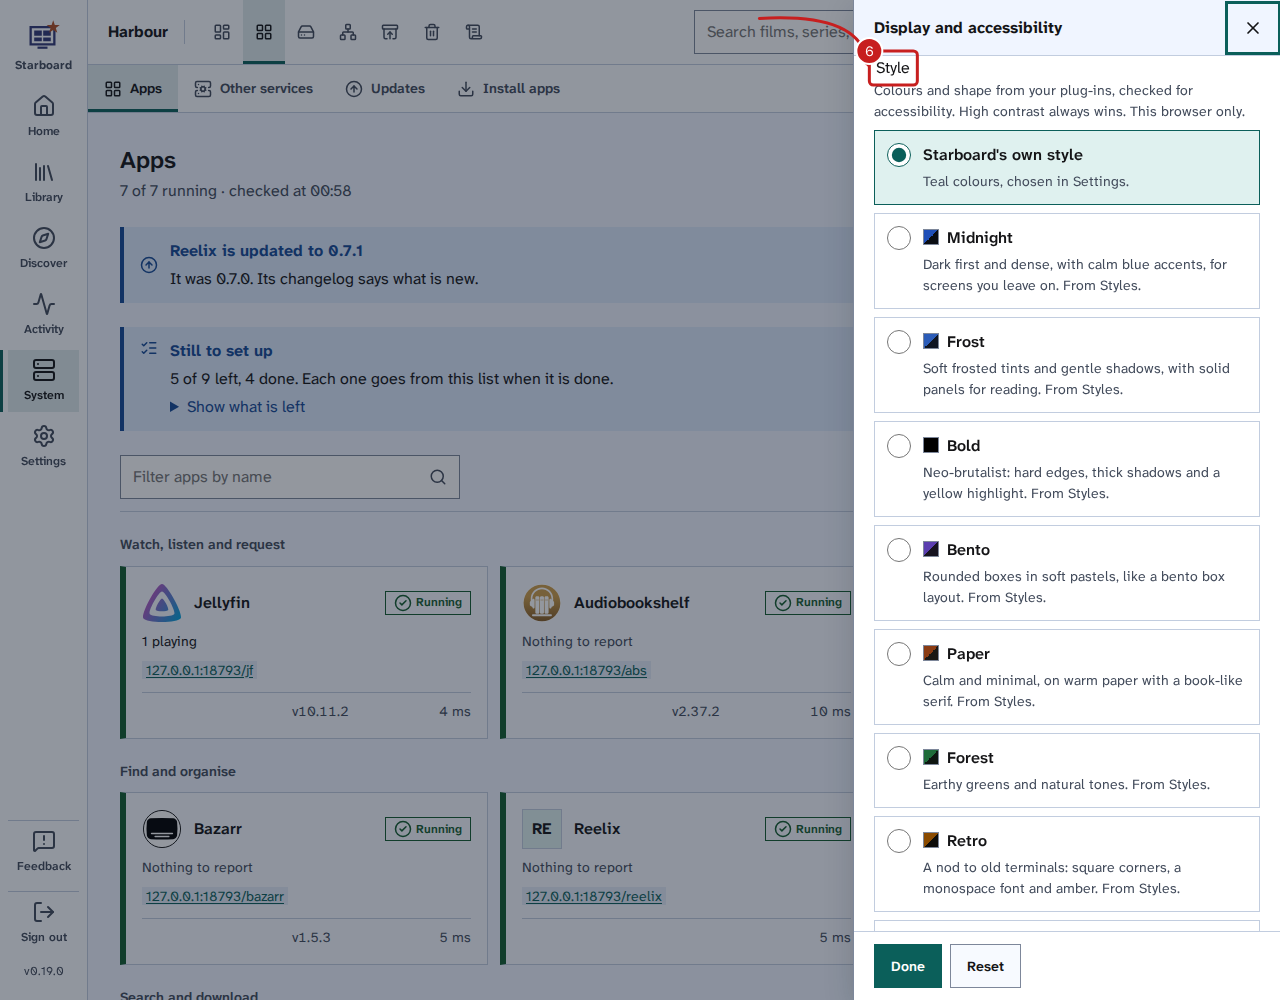
- For a plug-in with styles: select Display in the header of any page, then choose a style under Style. The page changes straight away. You can also select Use this style on the plug-in's own tab. Read Change text size, theme and other display settings.
Manage your plug-ins
Settings, then Plug-ins, then Manage lists every plug-in you added, with its state, Settings, Activate or Deactivate, and Remove. Each plug-in also has its own tab after Catalogue, with its settings, what it may do, and Remove at the foot.
Add a catalogue from a link
A catalogue is a list of plug-ins that someone publishes as one file, catalogue.json. Add one, and its
plug-ins show on the Catalogue page next to the Starboard plug-ins collection. Adding a catalogue installs
nothing: each plug-in still shows its warning before it is installed.
- On the page of the person or project that makes the plug-ins, copy the catalogue's address. It starts with
https://and usually ends withcatalogue.json, such ashttps://raw.githubusercontent.com/TheMightyTRex/starboard-plugins/main/catalogue.json. - Go to Settings, then Plug-ins, then Catalogue.
- Under Catalogue sources, paste the address into Catalogue address, then select Add catalogue. Starboard reads it and says how many plug-ins it lists.
- Its plug-ins appear in their own section of the Catalogue, named after the catalogue.
Starboard reads each catalogue at most once a day. To take one off, select Remove next to it under Catalogue sources. Plug-ins you already installed from it stay. The Starboard plug-ins collection is always there and cannot be removed. Starboard reads 10 catalogues at most.
Only add catalogues from people you trust. Starboard did not make the plug-ins in them.
Add a plug-in by its address
On the Catalogue page, under Add one from elsewhere, paste the address of the plug-in's
starboard-plugin.json into The plug-in's manifest address, or choose the file in Or its manifest file.
Select What it does, read the test results, then select Install and its name. Carry on from step 3.
From a zip file
A private plug-in, such as On demand, comes as a zip file instead of an address. On the Catalogue page, under Upload a zip file, choose the zip and select Check the zip. Read Add a plug-in from a zip file.
With the plug-in's own installer
Some plug-ins come with an installer. Run it on any computer with Python, such as python3 install.py, and enter
your Starboard's address, such as http://192.168.1.20:8095. Your browser opens the Catalogue page with the
plug-in already shown under Add one from elsewhere. Select Install and its name, then carry on from step 3.
Test a plug-in
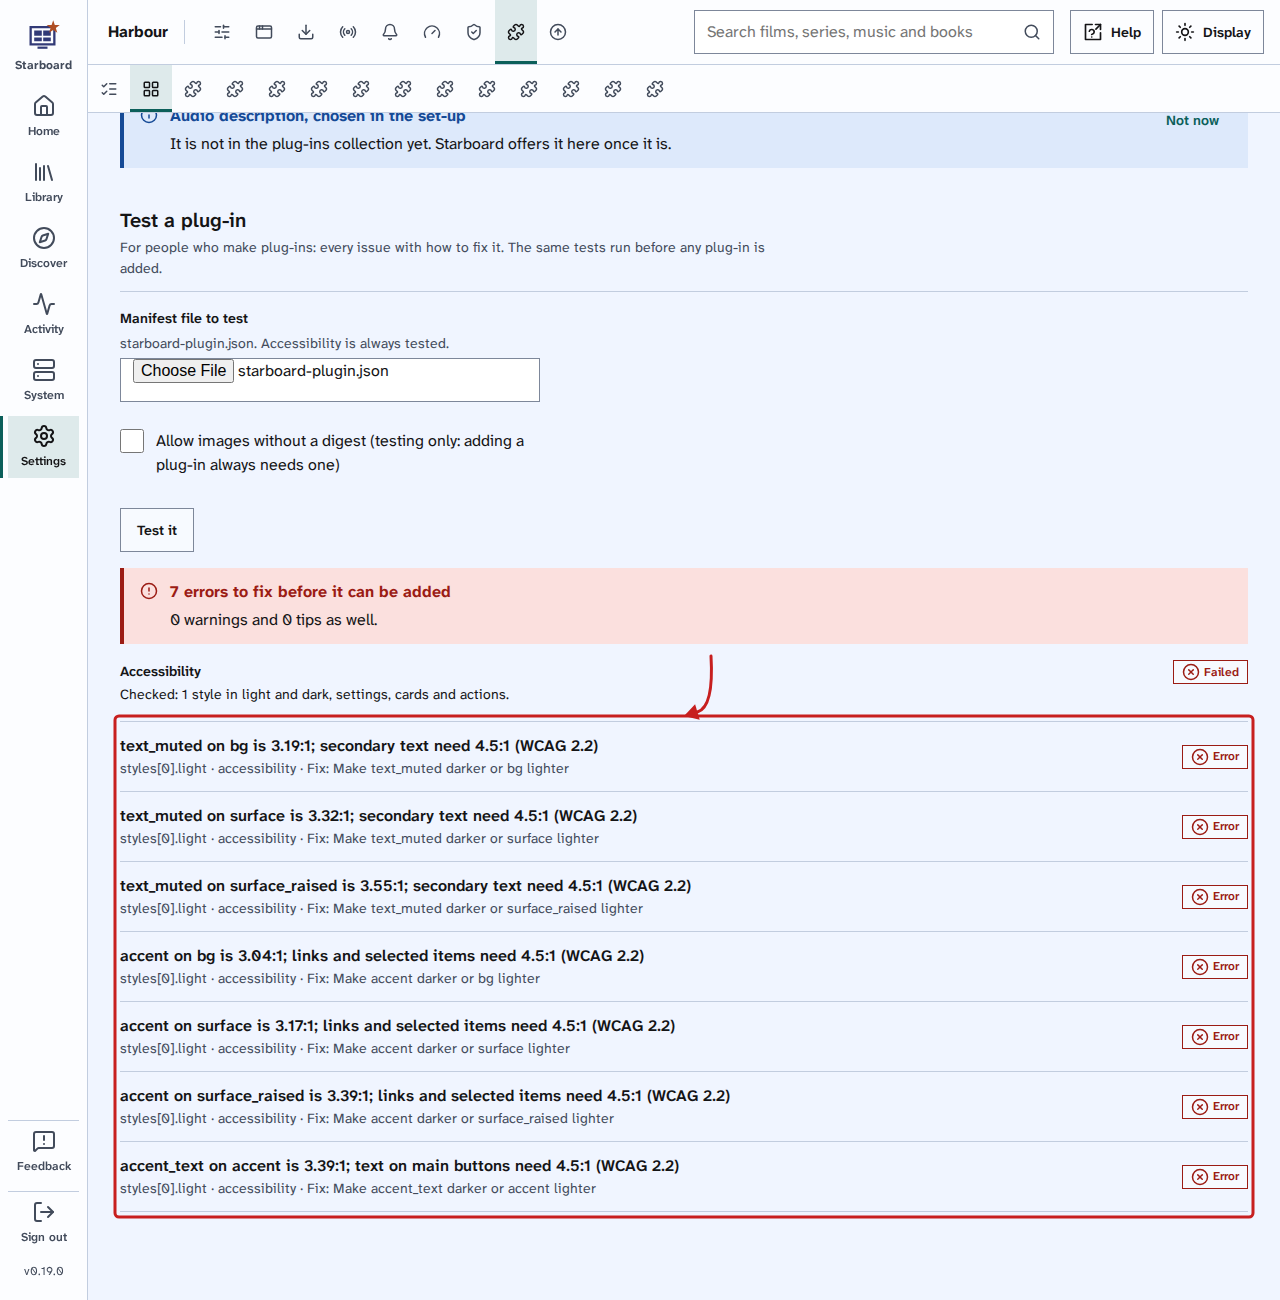
If you make plug-ins, test one before you share it. In Settings, then Plug-ins, then Catalogue, under Test a plug-in,
choose its starboard-plugin.json and select Test it. Starboard lists every issue with where it is, what is wrong and
how to fix it. Accessibility is always tested: every style in light and dark, and the words people read.
Things to note
- Styles apply to the browser you choose them in, like the rest of Display.
- Some plug-ins add cards to the dashboard. Read Use and change the dashboard.
- High contrast, text size, wider spacing, underlined links and reduced motion always win over a style.
- Remove and the plug-in's name stops the plug-in and its containers, and stops its key working. Its folder
is kept in
data/plugins/.removed, so you decide when to delete it. - Deactivate all plug-ins deactivates every active plug-in at once, if something goes wrong.
If it does not work
- "This plug-in cannot be added": read the test results under it. The plug-in's maker needs to fix each error.
- "That is not a plug-in catalogue": the address is not a
catalogue.json. Check you copied the catalogue's address, not the address of its web page. - "This catalogue did not answer": Starboard shows the list from the last time it did, and tries again the next day.
- "Starboard has no access to Docker here": plug-ins that run containers need Docker access. Read Change what Starboard can access. Plug-ins with only styles do not.
- A style does not change anything: check that High contrast is inactive in Display, and that the plug-in is Active.
Find out more
This page on GitHub, where the help is written.